

A garden shed is more than just a storage space—it’s a sanctuary for gardeners, DIYers, and outdoor enthusiasts. Building and organizing your garden shed thoughtfully can save you time, maximize space, and protect your tools for years to come.
Below, I will provide 15 top garden shed storage ideas and dive into each storage idea, offering step-by-step guidance to help you create the ultimate garden shed.


What Makes the Best Garden Shed Storage?
The best storage solutions combine functionality, space optimization, and durability. It’s all about making your tools accessible, maximizing limited space, and protecting your equipment from damage.
15 Top Garden Shed Storage Ideas
1. Pegboard Wall Storage: Keep Tools Within Reach
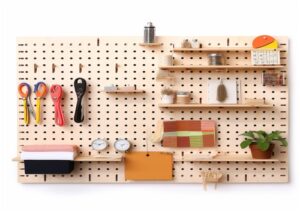
A pegboard is one of the most efficient ways to organize tools. Here’s how you can set it up:
- Step 1: Purchase a sturdy pegboard (wood or metal) and cut it to fit your desired wall space.
- Step 2: Secure the pegboard onto the wall using screws and wall anchors, ensuring it’s firmly attached.
- Step 3: Add hooks, small shelves, or baskets to the pegboard. Use these to hang hand tools, gloves, or even flower pots.
- Tip: Outline tools with a marker on the pegboard to maintain organization and know where each tool belongs.
2. Overhead Shelving: Utilize Vertical Space

Sheds often have unused ceiling space perfect for overhead shelves.
- Step 1: Measure the width and depth of your shed’s ceiling area to determine shelf size.
- Step 2: Install sturdy brackets on either side of the wall, ensuring they can support weight.
- Step 3: Mount wooden planks or pre-made shelves onto the brackets.
- What to Store: Use this space for lightweight items such as plastic pots, spare gloves, or seasonal decorations.
- Safety Tip: Avoid placing heavy items overhead to prevent accidents.
3. Magnetic Tool Strips: Keep Small Tools Accessible
Magnetic strips are a sleek and efficient way to organize metal tools.
- Step 1: Purchase strong magnetic strips from a hardware store.
- Step 2: Mount the strip above your workbench or along a wall.
- Step 3: Place metal tools like screwdrivers, pliers, and scissors on the strip.
- Tip: Use multiple strips for larger tool collections or sort tools by size for convenience.
4. Stackable Storage Bins: Organize Smaller Items
Stackable bins are perfect for keeping small, loose items in check.
- Step 1: Choose sturdy, stackable bins in different sizes, preferably transparent or labelable.
- Step 2: Sort items like seeds, gloves, and small tools into separate bins.
- Step 3: Stack the bins in a corner or on a designated shelf.
- Pro Tip: Place frequently used items in the top bins and label each bin for easy access.
5. Wall-Mounted Hooks: Hang Your Large Tools
Long-handled tools like shovels and rakes can clutter the floor. Wall hooks are an easy fix.
- Step 1: Install heavy-duty hooks at intervals along your shed wall.
- Step 2: Hang tools vertically by their handles, ensuring they’re secure and won’t fall.
- Step 3: Group similar tools together (e.g., rakes with rakes, spades with spades) for easy access.
6. Sliding Storage Panels: Maximize Narrow Spaces
Sliding panels allow you to store items in tight spaces while maintaining accessibility.
- Step 1: Build a sliding panel system using wooden boards mounted on a sliding rail.
- Step 2: Attach hooks or magnetic strips to the panel to hold tools or small items.
- Step 3: Slide panels back and forth to access items on both sides.
- Pro Tip: This is perfect for sheds with limited floor space!
7. Foldable Workbench: Work and Save Space
A foldable workbench provides a workspace without occupying permanent space.
- Step 1: Choose a foldable workbench or build one with hinges and a wooden board.
- Step 2: Mount the bench to the wall and install brackets for support.
- Step 3: Fold it down when not in use to free up space.
- Tip: Add small storage compartments underneath the bench for added utility.
8. PVC Pipe Tool Holders: Store Long Tools Upright
PVC pipes are an innovative solution for storing long-handled tools.
- Step 1: Cut PVC pipes to about 12–18 inches long.
- Step 2: Secure the pipes vertically to a wooden plank or directly onto the shed wall.
- Step 3: Slide tools like rakes, brooms, or shovels into the pipes.
- Tip: Use pipes of varying diameters to accommodate different tools.
9. Corner Shelves: Utilize Every Inch
Corners often go unused in sheds, but corner shelves make the most of them.
- Step 1: Measure the corner and cut triangular wooden boards to fit.
- Step 2: Mount the boards onto brackets secured to the walls.
- Step 3: Use these shelves for small pots, cans, or decorative items.
- Pro Tip: Stack multiple shelves for added storage in tight spaces.
10. Reclaimed Pallet Storage: DIY Charm
Reclaimed pallets are cost-effective and add rustic charm to your shed.
- Step 1: Find an old pallet and clean it thoroughly.
- Step 2: Mount the pallet vertically on the wall, securing it firmly.
- Step 3: Use the pallet slats to hold small tools, pots, or spray bottles.
- Creative Tip: Paint or stain the pallet for a polished look.
11. Drawer Organizers: Tidy Up Small Hardware
Loose screws, nails, and bolts are easy to lose. Drawer organizers solve this problem.
- Step 1: Purchase organizers with multiple compartments.
- Step 2: Sort your small hardware into the compartments by size or type.
- Step 3: Place the organizers in a drawer or on a shelf.
- Tip: Label compartments for easy identification.
12. Hanging Baskets: Lightweight and Handy
Hanging baskets are perfect for storing small, lightweight items.
- Step 1: Install hooks or small rods along the wall or ceiling.
- Step 2: Hang baskets using the hooks.
- Step 3: Store items like gloves, seed packets, or small tools in the baskets.
- Tip: Use wire baskets for a clear view of the contents.
13. Rolling Cart Storage: Mobility and Convenience
A rolling cart lets you move tools around easily as you work.
- Step 1: Purchase a sturdy cart with multiple tiers.
- Step 2: Organize tools, pots, and materials on the cart.
- Step 3: Roll the cart to your garden or workspace as needed.
- Pro Tip: Choose a cart with locking wheels for stability.
14. Outdoor Storage Bench: Dual-Purpose Solution
An outdoor storage bench combines seating with hidden storage.
- Step 1: Buy or build a storage bench with a hinged lid.
- Step 2: Store items like cushions, garden tools, or spare pots inside the bench.
- Step 3: Place the bench outside your shed for added functionality.
- Tip: Use weatherproof materials to protect items from the elements.
15. Labelled Containers: Organize and Simplify
Labels are the key to a well-organized shed.
- Step 1: Sort items into containers or bins.
- Step 2: Use waterproof labels or markers to clearly label each container.
- Step 3: Arrange the containers on shelves or in stacks.
- Pro Tip: Color-code labels for different categories like tools, seeds, and chemicals.
Best Garden Shed Storage Solution
For versatility, pegboard wall storage stands out as the best solution. Its customizable design accommodates various tools, saving space and simplifying access. Add hooks, baskets, or shelves for a tailored system.
Tips and Tricks for Organizing Your Garden Shed
- Declutter First: Get rid of unused or broken items to free up space.
- Group Similar Items: Store tools, seeds, and pots in separate zones.
- Use Clear Bins: Easily see contents without rummaging.
- Label Everything: Save time finding what you need.
- Invest in Quality: Use durable storage materials to withstand wear and tear.
- Create Vertical Storage: Maximize space with wall-mounted racks and shelves.
- Keep Safety in Mind: Store sharp tools out of children’s reach.
By incorporating these storage ideas, you’ll not only build a functional and organized garden shed but also create a space that inspires productivity and creativity. Whether it’s installing pegboards, adding foldable workbenches, or using reclaimed pallets, there’s a solution for every need and shed size.
Start your garden shed project today—your tools (and future self) will thank you!


